Bypassing Unity’s faults

Our game is down to just polish now, so we are focusing on making everything be as good looking and bug-free as possible. One of the issues I mentioned last week was that for some reason unity refused to change the color of game objects which had an Animator attached to them. Luckily I found a way to remedy this problem.

While Unity refused to change the regular R, G, B settings of the color of the object, bizarrely enough, it still let me adjust the alpha on the object. So, after some thinking, sleeping, eating and procrastinating, I figured out a cheap but somewhat effective solution on what to do. In reality, all I needed was the object to go from black to white, to show it’s distance in the background. That’s when it hit me, all I could do is just create another object, that’s black at the same position.

I decided to run this through code for all of the moving objects in the background to create a child object, with a sprite renderer that has the same image as their parent. After that I locally move their z position just slightly to make sure they are always behind their parent. When it came down to the colors, I made sure that no matter what, the parents are always full white color and the children are in full black color, right before the Animator object got attached, since the color won’t change until I disable the Animator.

Final result

With all of that in mind, all I had to do was a few small changes to the code to make it so that the child’s alpha fades in first in the background, and afterwards the parent. This gave the fake illusion that it’s the same object just going from Black to White. I’m still not sure what the real issue is with Unity when it comes to this. I have some idea that it’s probably the animations somehow trying to alter the colors of each frame manually, but I digress. I’m just glad I was able to find a sort of “ghetto” solution for this, before release.
Level Transition

Our game is in the final stages of being complete, so at the moment we are focusing on visual polish, fixing any bugs we can find and improving the art assets. As far as visual polish goes from a programming perspective, this week I was tasked with doing the level transition for the game. Currently it operates on a never endless mode where after all the waves have passed, the game restarts with more difficult enemies and will continue to do so to a point where it becomes so challenging that the player cannot survive.

Youtube Video

The video is from earlier in the week when I was showing what I had so far to my team. Since then I’ve tweaked it here and there to make it look just better in general, but here is a rundown of what I’ve done so far for it and what I plan to adjust in the upcoming days.

To start with, there are currently 2 overall scripts that are in effect, both of which are fairly small and simple. All of the background elements such as the plants and grass are children objects of the overall “Background Parent”. This parent has a script which, upon being triggered to begin the transition, goes through all of it’s children which contain the second script and feeds them a Delta value which is the zoom.

The second script, which all the children have, is a modified script from weeks ago which is allows for a Parallax effect. In combination with that, when they are fed this “zoom” delta from the parent, their position and scale is increased, giving the impression that the player is going towards them. When they are close enough, they start to fade away and once they are completely out of view, they are repositioned at the back of the scene and fade back in. Their zoom value is also reset to the minimum allowing them to fade back in and give the sense that they are at a distance. Originally I had them remove themselves when they get close enough and spawn a clone at the far back, but I was worried what would happened when having this sequence play for a long time. Every time I spawned a clone, it kept doubling the name over so it ended up looking like “Object(Clone)(Clone)(Clone)”, so I figure I’d take the safe route.

To further give the notion of distance, I also made it so that the less their zoom value is, the darker they are. However an issue as come up which I have yet to figure out how to solve, since I believe it is Unity related and I haven’t found a solution online. For some bizzare reason, sprite modification to the Sprite Renderer stops working when it has an Animator attached. At the moment, since I am changing all the colors of the object manually, depending on their zoom, they refuse to change color when I attach an Animator to them, except the Alpha channel. I think there is some conflict with the Animator allowing for each frame to have a custom color. If only I had some way of accessing the color for each frame, or to have the frames read the color off of a script. If there is a way, I have yet to find it, which is going to be quite troublesome since I was hoping to use animations to make the background feel more alive.


Finalizing the weapons

Continuing off of last week’s post, I’m going to talk about the various changes and additions I’ve made to the weapon system and how I’ve just about finalized it.

ANIMATION

This week my artists sketched up the final weapon that was implemented into the game and also added animations for all the guns. Adding them to the weapons themselves was fairly easy. I coded in the base weapon that whenever the player fires a shot, it would trigger an animation event on the weapon. I exposed the trigger name as a public variable, allowing me to simply adjust the animation name from the Unity Editor instead of having to manually implement it for each weapon.

This is not so much animation, but I’d say it tacks on. I decided to add recoil to the weapons whenever they fire. Currently it works on the principle of making a randomized vector every time the gun fires and sets a recoil-smoothness float which I use a Lerp to adjust the position of the gun between it’s original position and the original position + random recoil offset. The Lerp float reduces in to 0 over-time at an adjustable speed. With that in mind, in order to finer tune the recoil, I exposed the Minimum recoil, Maximum recoil and Recoil recovery speed as exposed variables.

WebM Example

AUDIO

One of the most glaring issues I immediately noticed was that the firing sound got cut off every single time you started playing it. This is because 1 entity cannot seem to emit more than 1 sound at the same time. So as an alternative, what I did was create a temporary audio entity at the current location of the entity spawning it and modify it as I pleased, which solved the issue of sound stacking.

FINALIZING

One of the final issues I noticed was that the bullets didn’t always come out of the end of the gun. This was due to the fact that each gun has it’s own size and I can’t always make sure that the bullets come out the same part of the sprite, since this isn’t a 3D model with attachment points. So, as an alternative, I made a code-relative attachment point for the guns and exposed them as public variables, so the creation point of the bullets can be adjusted through the Unity Editor for each weapon.

WebM Example

Weapon Upgrades

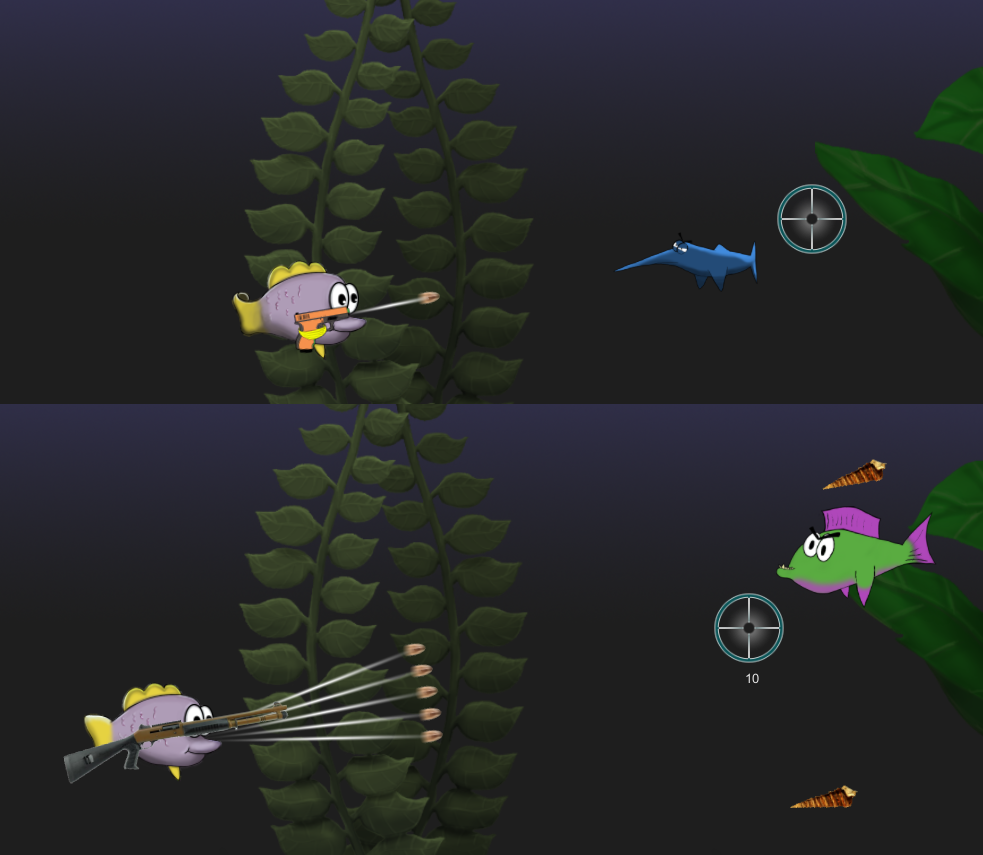
Last week we began discussing having various weapons in our game, so we decided to have them as a sort of “Temporary” upgrade. Currently the player starts with just a pistol. It has a medium fire rate, basic 1 shot pattern and the projectiles move at a somewhat normal pace. On top of this, since it is the starter weapon, it has infinite ammo as well.

Marcus mentioned something that was already on my mind, which was that we should have weapons that have unique patterns that offer new gameplay aspects. After some discussion with the team, we decided to have a simple test weapon to see how the concept would handle, so I decided to do a shotgun. The weapon handles just like one would expect: It fires several bullets in a somewhat wide cone spread, slow rate of fire and unlike the pistol, it has limited ammo.

Currently, the shotgun is a derivative of the pistol, which acts like the overall prefab for all current and future guns. The weapon is setup to have a current ammo count, overridable firing function and fire rate setting. Whenever I pick up a weapon, it runs through all the player children to see if there is an already existing weapon. If there is, it will remove it, then position itself over the player and apply to become a child of the player.

  • The ammo count is set to be -1 by default. The reason I do this is to quickly indicate that the weapon is running on infinite ammo instead of having to rely on a separate value. It doesn’t cause any issues since I only check the “Take away ammo” function as long as your ammo is above 0. Alongside with this, I made the ammo counter show up below the crosshair, since most of the time, the player will be looking at where he is aiming making it easier for him to focus on how much ammo he has left.
  • The overridable firing function allows me to quickly make a new fire pattern should I require it. As mentioned, I already have a shotgun spread pattern which I simply made by running a “for loop”, each iteration giving a new aim angle for the projectile.
  • The firing rate ties in directly with the fire function, since I need it to make proper unique firing patterns, such as a slow firing sniper rifle which penetrates through enemies or a fast firing light-spread assault rifle.

2017024cc95487